Introduction
Volumes are a great way to store data for your instances. However, sometimes you may need to resize a volume to add more space. This article will guide you through the process of resizing a volume within OpenStack and resizing the filesystem within the instance (server). For most OpenStack environments, a live extend is possible.
Using the OpenStack Dashboard
To resize a volume using the OpenStack Dashboard, please follow these steps:
Step 1
First log in to the OpenStack Dashboard
Step 2
Navigate to the Volumes section
Step 3
Click on the volume you want to resize
Step 4
Click on the Small Arrow button behind the volume and click Extend Volume
Step 5
Enter the new size of the volume and click Extend Volume
Your volume is now be resized within OpenStack. Please note that you may need to extend your filesystem within the instance (server) as well before you are able to use the new space. To do this please proceed to the section: Resize filesystem within the instance
Using the OpenStack CLI
To resize a volume using the OpenStack CLI, please follow these steps:
Step 1
First make sure you have setup the OpenStack CLI and that you are able to
execute commands using the openstack command. For more information please
refer to the
Using the OpenStack CLI article.
Step 2
Identitfy the volume you want to resize we do this by listing the volumes
openstack volume list
Step 3
Run the following command to resize the volume
openstack --os-volume-api-version 3.42 volume set --size <new-size-in-gb> <volume-id-or-name>
Your volume is now be resized within OpenStack. Please note that you may need to extend your filesystem within the instance (server) as well before you are able to use the new space. To do this please proceed to the section: Resize filesystem within the instance
Resize filesystem within the instance
For both Linux and Windows, you will need to resize the filesystem within the instance (server) as well.
Linux
After resizing the volume within OpenStack, you will need to resize the filesystem within the instance (server) as well.
Step 1
First we need to identify the volume. This can be done using the lsblk command.
lsblk
Step 2
The folowing step is only required if you have partitions on the volume.
If you have partitions on the volume, you will need to resize the partition
before resizing the filesystem. This can be done using the growpart command.
sudo growpart <disk> <partion_number>
Step 3
After you will need to resize the filesystem. This can be done using
the resize2fs command.
resize2fs <disk/partition>
Windows
After resizing the volume within OpenStack, you will need to resize the filesystem within the instance (server) as well. We recommend using the documentation provided by Microsoft to resize the filesystem.
Instruction for resizing using Disk Management
Instruction for resizing using PowerShell
Using Disk Management
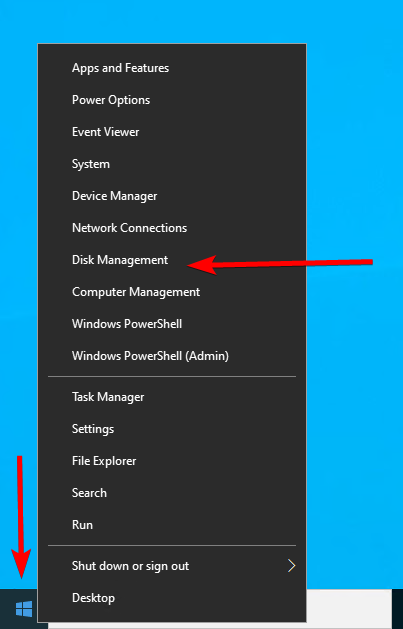
Right-click the windows logo in the left bottom corner and click
on Disk Management.
Right-click the volume you want to resize and click Extend Volume.
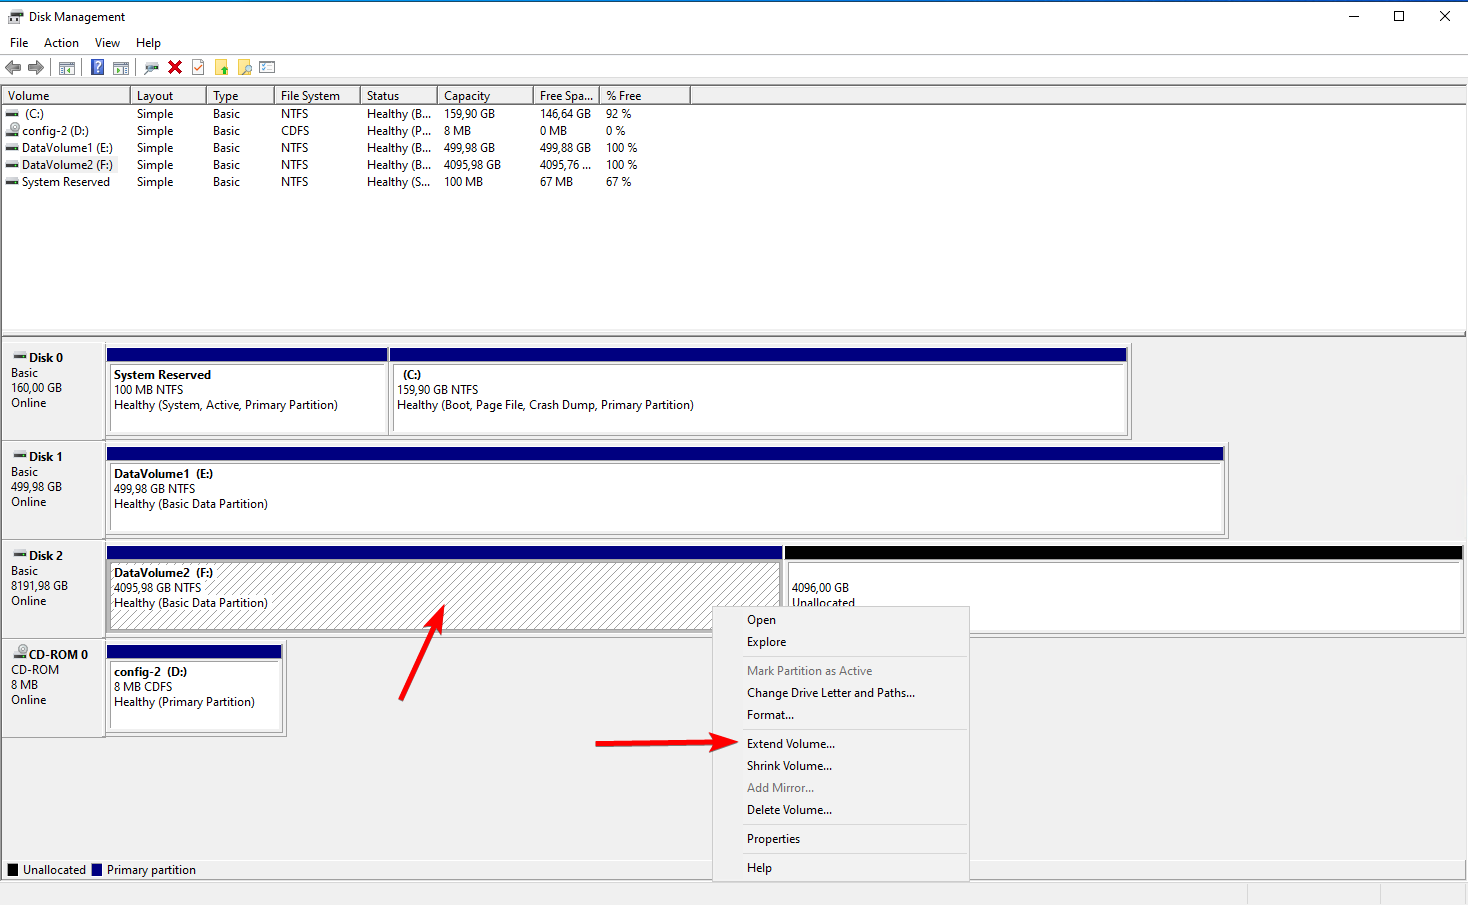
Follow the wizard to extend the volume and click Finish to complete the
process.
If you want to use all of the available space, you can just click
Nextand thenFinishin the wizard.
Using PowerShell
To resize the filesystem using PowerShell, you can use the Resize-Partition
cmdlet. The Powershell script below will resize the partition to the maximum
size. Replace <drive_letter> with the drive letter of the partition you want
to resize.
# Set the drive/partition you want to resize
$TargetDrive = "<drive_letter>"

# Get the maximum size of the partition
$DriveSize = (Get-PartitionSupportedSize -DriveLetter $TargetDrive)

# Resize the partition
Resize-Partition -DriveLetter $TargetDrive -Size $DriveSize.SizeMax