By default it is possible to create an OpenStack router that has an external IP and can route the traffic of an internal network to the internet. To gain more control over the traffic to the internet, create VPN connectivity and allow for more fine-graned security policy’s, it is possible to create an instance or multiple instances to replace the OpenStack router on an internal network This tutorial guides you through the process of creating instances, and configure OpenStack to allow proper routing and HA IP. The tutorial does not include configuring the firewall.
Requirements
- A public IPv4 subnet where you can set allowed address pairs with at least three available IP addresses
- For example Rent an IPv4 range
- An internal network without a router and with at least three available IP addresses (Named
internal-networkin this tutorial) - A Firewall image in OpenStack (for example OPNsense AMD64 nano image from https://opnsense.org/download/)
Design
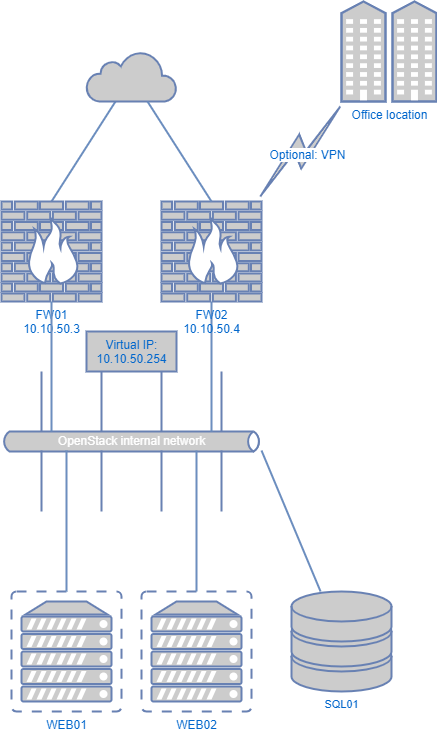
We have multiple firewall / router instances within the OpenStack project. All routers have an internal IP, and an IP address on a public network. Next to that, we have one virtual IP on the internal network and one virtual IP on the public network. The firewalls are configured in an active / standby configuration and through CARP or VRRP decide which instance is the master.
Modify subnet allocation pools
Adjust the DHCP allocation pool to provide at least one IP addres for the Virtual IP of the firewall cluster (in this example 10.10.50.254)
Step 1: Log in to the OpenStack dashboard and proceed to the Network tab.
Step 2: Select Networks and then select your internal network.
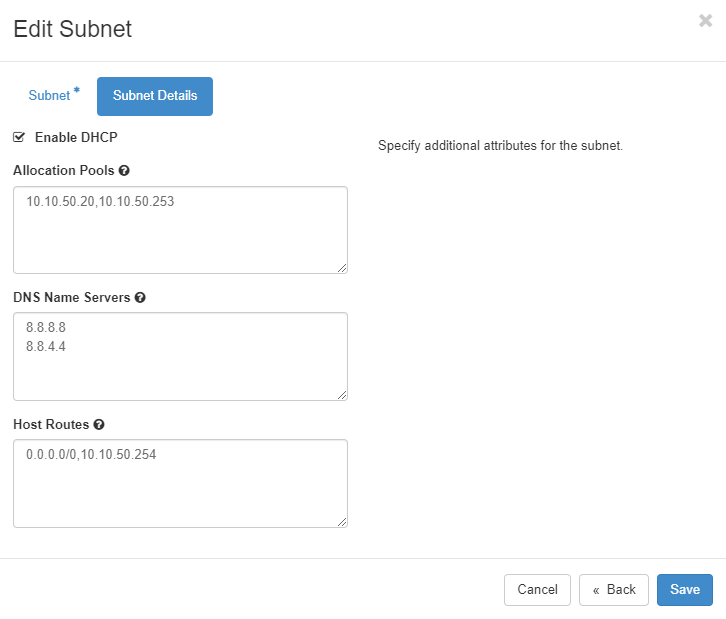
Step 3: Select Subnets and click Edit Subnet on the subnet where your Virtual IP should live.
Step 4: Go to Subnet Details and modify the Allocation Pools to remove 10.10.50.254 from the allocation pool.
Step 5: Click on Save.
Repeat the same process for the rented IP range
Create instances to use as a firewall / router
For this tutorial assumes two instances are created, both in a different availability zone. you can use the following tutorial combined with the specs below:
On the Details tab:
- Instance Name: FW01 / FW02
- Description: Firewall for internal network
- Availability Zone: Choose an availability zone to your liking
- Instance Count: 1
On the Source tab:
- Select Boot Source: Image
- Create New Volume: No
- Image Name: Use the firewall image for this instance (For example OPNsense)
On the Flavor tab:
- Flavor: Small HD 4GB
On the Networks tab:
- Network: Add the rented range as well as your internal network
On the Security Groups tab:
- Security Group: allow-all
Disable port security for FW01 and FW02
Step 1 Go to compute > Instances > FW01 > Interfaces tab
Step 2 Click on Edit port for the WAN interface
Step 3 Deselect Port Security and click update
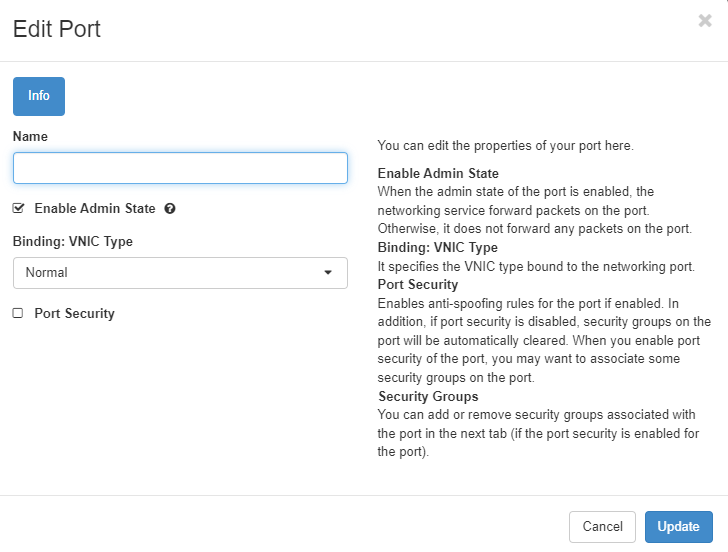
Step 4 Do the same for the LAN interface
Step 5 Do the same for FW02
Configure the firewall instances
Install the firewall instances to your liking, but at least configure the following parameters
- Configure the IPs (both the WAN and LAN subnet will provide have DHCP, but static configuration is also possible. please note it is advised to use the IPs provided by OpenStack)
- Configure a HA / virtual / vrrp / carp IP for IP 10.10.50.254 on the LAN interface
- Configure a HA / virtual / vrrp / carp IP on the WAN interface with the IP which was deducted from the rented IPv4 DHCP range earlier
- Optionally: configure an outgoing NAT rule to translate outgoing traffic to come from the virtual IP
Configure routing on the subnet
- Go to network > networks and navigate to network
internal-network - Go to subnets and click
Edit subnetfor the subnet - Navigate to
Subnet Details - Add a host route
0.0.0.0/0,10.10.50.254and clickSave
Validate the network
Create a client instance and validate if internet connectivity is flowing through the firewall cluster.